

How To Install A Marble Threshold Between Hardwood And Tile
This article is meant to educate us on how to install marble threshold, installation of hardwood threshold, the various tools used for the installation of a marble threshold, and other relevant topics discussed in the articles.
Tips for Installing Marble Threshold
Marble thresholds (sometimes called marble saddles) are common in many homes, often constitute at bathroom entries. They look lovely, they're cool and polish to the touch, and they're non costly.
Every bit of late, I introduced a marble limit every bit a component of a more than thorough abode recovery venture. This outline shows the means I took – alongside the apparatus and textile subtleties. Some Amazon connects to basic things too. For me, considering a lot more than considerable exertion, this seat establishment was a snappy and straightforward venture that was honestly sort of enjoyable to handle! It was a spontaneous creation that drove me to this marble limit establishment
The Vile Physical Slab
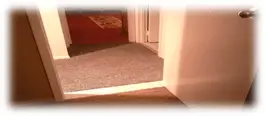
After re-making an entryway that had recently been taken out, I ended upward in somewhat of a difficulty gazing down at roofing on the two sides of the newly introduced entry and frame – with an uncommonly item region of a terrible glancing solid piece in the middle.
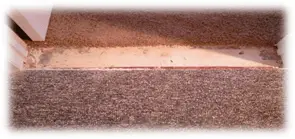
This house was beingness readily available to be purchased, and unmistakably, this must be tended to. There were no leftovers of the kickoff roofing from the rooms on either side of the entryway, and the two rugs were one-time – having been introduced in any event eight-10 years earlier. In any event, one was fraying a piece, which wasn't unexpected at it was as of belatedly in a wrong spot that did not exist anymore.
Seeing no handy method to accost this fix with roofing, an excellent marble limit appeared to be a feasibly platonic arroyo, as long as I could discover one of the proper widths. (Preferably, I needed to embrace all the solid and boom downwardly but a little piece of the two covers as well – hold them downwardly and address the fraying.)
Installation Tools and Materials for marble threshold
Information technology went on just a alone outing to the tool shop; I was enchanted to run into a vast assortment of marble limit widths, even some tightened on one of the two sides. The length was a worry too, obviously – however essentially less so. It just takes i slice with a wet saw to get the best possible size, and some dwelling comeback shops may even do this for yous on the off adventure that yous don't possess a wet saw at this bespeak, as a dominion for a little expense.
Furthermore, to the marble threshold, I also picked up several forest trim pieces equally this was indeed an improvisation effort, and I wasn't entirely sure the marble would be acceptable. I ever find it suitable to buy extra cloth (for well-nigh every project) – and then return whatever I don't use later on. Information technology was an extraordinary fortunate plough of events that the marble limit I discovered was the correct length – no moisture saw required for me. (Not that I don't possess one, but rather information technology turned out to exist situated in one more than state at that point)
The instruments and materials I amassed for this exertion included:
My shop vac – for readiness and tidy upwards.

BISSELL 2252 CleanView Hinge Upright Bagless...
- Buy Bissell, relieve pets; Bissell donates upward to 10 dollars to the Bissell pet foundation for every pet production buy, upon activation
- Powerful pet pilus choice up with triple activity castor gyre with scatter gratuitous engineering science
- Swivel steering to easily maneuver around furniture and other obstacles
A container of Liquid Nails subfloor
A container of Phenoseal white caulk Interior semigloss paint for cleaning up the door frame

How to Install Marble Threshold
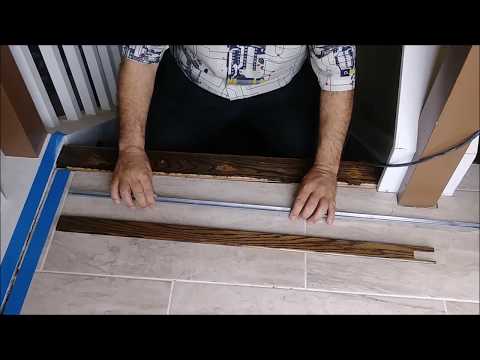
The photographs that followed show each progression of the cycle I followed, which took not precisely an hour without a uncertainty. Typically, it's in every case all-time to be as captious and cautious as could reasonably be expected – and that is the thing that a lot of the time.
First – I tidied upwards the work territory equally the almost ideal.
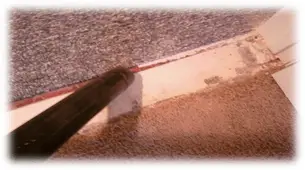
All debris got rid of from the concrete slab, and the carpets were trimmed gently where the frayed material was hanging loosely. I was cautious enough to keep all rug trimmings as I thought I might notice a utilise for them if the marble saddle didn't fit correctly.
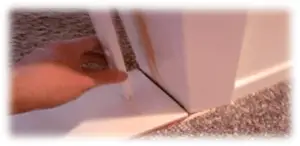
To test the seat for fit, I idea that it was essential to incompletely eliminate the inward trim pieces on the base inside the door frame, as demonstrated as follows. Did this cautiously with a sharp razor blade and a level screwdriver.
Read More than: How To Install Door Trim With Uneven Walls
Once I thought that all looks decently, I practical some of the subfloor Liquid Nails to ensure not to overdo it. I surely didn't want whatever of this oozing out onto the carpets after the marble threshold was positioned.
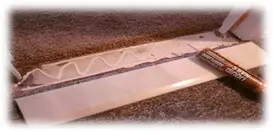
Once the saddle was nicely sited in identify, it's loftier time to restore the door jamb, making some of that Phenoseal caulk to make full them nicely, so I touched up the door jamb with the matching bear upon-up paint.

I concluded up using the carpet trimmings to ensure things look a clearer bit in a small area, I guess sort-of like hair plugs on a receding hairline? But I never used anything rather than using the marble for the threshold – the other extra wood trim pieces I bought were gladly taken dorsum by the hardware store.
Some final shots of the last room transitions
Everything looks clean, crisp, and properly finished. What'southward looks pretty cool is that this home sold nearly immediately when we finally put it on the market. Very close to the asking toll besides. I'm not and so sure it would take gone quite too with that ugly concrete slab exposed equally information technology was.
How to Install a Marble Sleeper Properly
The use of a marble threshold is the all-time pick for your doorway that will make your abode extra special. Not only is it more durable than a traditional wooden sleeper, but it is besides more than elegant and shows you a refined nature. Marble is a bit unlike to piece of work with than when you piece of work with wood or other materials, then here are a few tips and hints for installing a marble sleeper in your house:
Make Your Measurements Count
Marble is expensive, so you don't desire to waste any of information technology. So exist sure to measure out accurately and carefully earlier cutting the parts yous volition need for your marble sleeper installation.
First, place the marble piece for the threshold along with the doorway where you want to install it. This is done to encounter if it will fit or if you demand to cut it to get in work. With a pencil, mark the place on the marble where the threshold with the door is. You lot want the finished piece to sit in the doorway and not have cracks to let air in.
Another fact is that most marble sleepers come up in sizes two and iv inches broad and 30 or 36 inches long. If your threshold is dissimilar, you need to cut very carefully, so y'all don't accidentally crack information technology.
Cutting tips
The tool yous need to cut a piece of marble for a sleeper is a tile saw.
Sale

SKIL vii-Inch Wet Tile Saw - 3540-02
- Corrosive resistant stainless steel peak supports tiles up to 12 x 12-inch
- Adjustable rip argue with miter gauge for authentic straight and miter cuts
- Blade cooling water reservoir to proceed blade cool while minimizing dust and debris
Earlier switching on the saw, make sure that there is enough water in the holder under the saw blade. So carefully line upwards your marble sleeper piece, making sure the edge is on the marking you made with your measurements. Don't use much force when cutting the marble; leave the blade in and gently pull it along as y'all follow through the cut in the marble. The marble will exist wet after you cut information technology, and it will need to dry out out before you lot can put it in your door.

Last installation tips
Depending on the surface, your doorway is made of; you volition use different methods to secure your marble sill afterwards it is cut. If it's physical, you can use this set up and put information technology straight on the concrete. If it is wood, then yous need to put some baker lath on the doorway offset, then the marble holds something.
Safety precautions are important
Every bit with all household repairs, safety is paramount. When installing a marble sleeper, you are working with cutting very precipitous tools, etc. Therefore, it is advisable to wear middle protection in the form of goggles and heavy work gloves to protect your hands.

Gloves
Understand the cost
Generally, marble sleepers are betwixt thirty and 36 inches long, which costs between $ xx and $ fifty each, the grout costs around $ 28, and the full is your installation cost.
How to Install a Hardwood Threshold
Installing thresholds for hardwood floors will give the area under doors and betwixt the ii flooring types a professional, finished looking. Without limits, the carpet could peel, shoes could impairment the forest, and the room could have an ugly, unkempt appearance. Wood thresholds are available in many types, colors, and grain patterns to lucifer existing forest floors. The thresholds as well provide a safe transition between floors of varying heights, reducing tripping, and falling take chances.
Instructions
Ensure you remove whatever damaged or old thresholds from the hardwood floor with a modest pry bar. Loosen the old threshold with the lever on the bar, using a sparse putty knife under information technology to protect the hardwood floor. Vacuum dirt and grit from where the one-time threshold used to be with a handheld vacuum.
Measure the door opening or the length of the area where the part sill will be installed, using a record measure.
Cut the sill to size with a circular saw. Use 60 grit sandpaper to smooth out the rough, cut edge of the sill.
Identify the threshold in your desired location to check its length for accuracy. Apply a apartment wood tool to trim the sill'southward bottom if information technology sits likewise high above the surrounding ground level. Stick pieces of the wooden wedge to the lesser of the sill with construction adhesive if it sits too far between the surrounding floors
Lay the sill on a stable, flat surface and drill one/16 inch pilot holes along the length of the sill, using a drill scrap and ability drill. Spacing these holes at to the lowest degree every 6 inches apart.

Amazon Nuts Drill and Driver Multi-Flake Set -...
- 100-slice drill and driver multi-bit set up; ideal for metal, wood, plastic, masonry, and hole saws
- Includes 52 bits, 8 nut sockets, a magnetic flake holder, 4 hole saws, and more (roll down the page for a full list of included pieces)
- Made of durable, habiliment-resistant alloy steel with quenching treatment
Put the sill back in its intended place and use a hammer to cease nails through the holes in the subfloor. The nail heads farther sink into the holes with an awl.
Tips and Warnings
Remove unfinished thresholds, have the slice to a well-ventilated area, and use 60 grit sandpaper to smooth the wood. Vitrify the wood threshold with a 120-grit sandpaper slice and wipe off the dust with a damp material. Apply the wood color to the threshold with a soft cloth. Permit drying earlier installing sill.
If the subfloor is concrete, which requires the threshold for gluing, utilize structure adhesive to the hardwood flooring's border. Experience the threshold on the difference betwixt the two-floor types and push button downward on the piece to adhere to the tail. Place weights on the threshold while the glue drying, which is usually two to four hours.
Some retailers offering threshold metal parts for homeowners who desire a modern look.
Tools used to remove the metal threshold from a door
- a lever
- an oscillating tool or saw
- A spatula
- a screwdriver
- a drill
Tools used to Cut and install a metallic threshold
- a pencil
- a spare threshold
- force per unit area treated woods
- a record measure
- a circular saw or alternative cutting blade
- a screwdriver
- a drill
- silicone caulking
- a dust mask
- safety spectacles
Tools used to install marble threshold over a wooden threshold
- a jigsaw or reciprocating blade
- a lever
Tools needed to Make and install a threshold
- a pencil
- a tape measure
- pressure treated wood
- a circular saw or alternative cutting bract
- latex pigment or varnish
- a drill
- a two mm (ane/16 inch) drill bit
- iv cm (1.five in) terminate nails
- a grit mask
- safety glasses
The Benefits of Using Instant Glue to Repair Marble and Granite
Marble and granite are artful coatings widely used in the interior and exterior ornament of all types of constructions. Their placement requires an instant adhesive for beefy things that offers speed of application, resistance, and durability.
Marble was traditionally considered material for sculpture and fountains. All the same, its elegant appearance has extended its use to facades and floors of houses and buildings, also as to applications such every bit kitchen countertops and ornamental fireplace surrounds, for example.
Marble is formed from other stones that, due to the effect of loftier temperatures or an active fluid. Change their limerick to form a textile with streaks and stains. Through a polishing procedure acquires its well-known translucent appearance.
On the other hand, granite is a versatile stone with many decorative uses, including walls, floors, facades, and kitchen countertops. Information technology is a very resistant material and does non crave special care. So it is easy to keep in perfect condition without much try.
Both materials are heavy, then for their installation, information technology is necessary to have an adhesive for marble. And granite that guarantees speed of drying and durability.
Power Bond instant adhesives are the solution. They are single element adhesives, which facilitate their application. And cure in a few seconds, so it is unnecessary to use bras or presses to hold the rock in position.

The advantages of instant glue to marble and granite
- It is resistant to moisture, making it ideal for laying stone on exterior cladding. And flooring and in kitchens and bathrooms. Acquire to create falls on the bathroom floor.
- Its bounden strength resists upwards to two,270 kilos
- Adhesive tin be used to repair cracks and crashes on marble and granite
- Sticks rapidly to smooth surfaces, preventing unwanted slipping of heavy material
- Starts to dry out on contact with humidity from the environs or the surfaces to be glued
- Information technology does not comprise solvent, and then it does not stain the stones
- Retains its flexibility, so it reacts well to variations in temperatures
- Its use is like shooting fish in a barrel, and the applicator from the same container can be used or incorporated into automated awarding systems to speed up the process.
If you lot are looking for an adhesive for granite or marble that dries apace. And offers you fine finishes combining these materials with other surfaces. In that case, Ability Bond is the ideal solution.
Article Summary
We believe yous've learned concerning this commodity on how to install a marble threshold. Get the recommended tools and materials you lot need to install a marble threshold, and other relevant topics discussed.

Source: https://homeaffluence.com/how-to-install-marble-threshold/
Posted by: millervinalwases.blogspot.com
0 Response to "How To Install A Marble Threshold Between Hardwood And Tile"
Post a Comment